使用 UILayoutGuide 辅助布局
AutoLayout 的核心是约束(constraint),而约束的本质就是给相同或不同的 view 上的两个不同属性添加关联。那么一个 view 拥有哪些可以用来建立关联的属性呢,从 NSLayoutConstraint 的定义上可以全部找到:
enum NSLayoutConstraint.Attribute {
  // iOS 6+
  case left, right, top, bottom, leading, tailing, width, height, centerX, centerY, notAnAttribute

  // iOS 8+
  case leftMargin, rightMargin, topMargin, bottomMargin, leadingMargin, trailingMargin, centerXWithinMargins, centerYWithinMargins
  case lastBaseline, firstBaseline
}
虽然有着这么多的属性,但并非每个属性之间都能建立关联,原因在于这些属性被划分在了不一样的维度上:
| 水平方向 | 垂直方向 | 大小 |
|---|---|---|
| left, right, leading, trailing, centerX | top, bottom, centerY, firstBaseline, lastBaseline | width, height |
| 上述属性的 margin 版本 | topMargin, bottomMargin, centerYWithinMargins |
只有在同一维度内的属性之间才可以建立合法的约束,所以当你写出类似 a.left = b.top 的约束时,会收到运行时的报错:
Constraint improperly relates anchors of incompatible types: <NSLayoutConstraint:0x117d2ecc0 UIView:0x1160039c0.left == UIView:0x116003640.top (active)>
一个常见的问题
不能在同一维度建立约束虽然合理,但在实际操作起来会遇到一个非常常见的问题——无法按照比例对位置进行布局。如果需要一个 view 的高度是其父 view 的 1/3,用约束实现非常简单:
childView.heightAnchor.constraint(equalTo: view.heightAnchor, multiplier: 1 / 3)
然而如果需要一个 view 的垂直位置距离父 view 的顶部占父 view 高度的 1/3 时,如果使用 frame 方式布局:
childView.origin.y = view.bounds.height / 3
如果使用约束实现,不能简单地写成:
childView.topAnchor.constraint(equalTo: view.topAnchor, constant: view.bounds.height / 3)
类似的写法就犯了按照 frame 布局写约束的错误,会导致 childView 与顶部的高度固定,当父 view 变化时,childView 的垂直位置并不会随之变化。
一种简单的方式是使用一个隐藏的 view 辅助布局:
helperView.heightAnchor.constraint(equalTo: view.heightAnchor, multiplier: 1 / 3)
childView.topAnchor.constraint(equalTo: helperView.bottomAnchor)

helperView.isHidden = true
由于 helperView 是隐藏的,同时也避免了绘制上的开销。但这样的做法还是有两点可能的问题:
首先,可能会有些操作需要对某个 view 的全部子 view 执行同样的操作,例如设置全部 label 的字号。然而隐藏的 view 仍然会在 view.subviews 数组中,需要在遍历时进行额外判断;
另外,有些场景需要对外提供用来建立约束的属性,或者称为锚点。这种情况下如果对外提供一个 view 很容迷惑调用方,提升了沟通上的成本。
那么,有没有什么东西既不是 view,无需参与到原有的视图层级当中,又可以用来提供布局的属性呢?UILayoutGuide 就是在这种背景下在 iOS 9 版本中引入的。
UILayoutGuide 是什么?
简而言之,UILayoutGuide 提供的是对一个不可见矩形区域的描述。虽然不可见,却可以通过 UILayoutGuide 提供的锚点与可见的 view 建立约束,从而与之前 helperView 解决相同的问题,同时不需要加入视图等级。如果作为对外提供接口,也可以让调用方明确目的是布局。从而避免上述两点问题。
可能大部分人和我一样,都是从 iOS 11 版本系统提供 safeAreaLayoutGuide 之后才开始注意到 UILayoutGuide 的。但从 iOS 9 版本开始,苹果官方就开始引入各种不同用途的 UILayoutGuide 用以辅助布局了。
有哪些 UILayoutGuide?
layoutMarginGuide (iOS 9)
最早引入的,同时也是最为灵活的就是 layoutMarginGuide。layoutMarginGuide 提供的是子 view 相对于父 view 边缘间距的统一配置,例如子 view 与父 view 的左边间距为 20:
childView1.leadingAnchor.constraint(equalTo: view.leadingAnchor, constant: 20)
childView2.leadingAnchor.constraint(equalTo: view.leadingAnchor, constant: 20)
childView3.leadingAnchor.constraint(equalTo: view.leadingAnchor, constant: 20)
当需要调整间距时,就需要修改每一个涉及到的 20。如果使用 layoutMarginGuide:
view.layoutMargins.left = 20

childView1.leadingAnchor.constraint(equalTo: view.layoutMarginsGuide.leadingAnchor)
childView2.leadingAnchor.constraint(equalTo: view.layoutMarginsGuide.leadingAnchor)
childView3.leadingAnchor.constraint(equalTo: view.layoutMarginsGuide.leadingAnchor)
就可以通过设置父 view 的 layoutMargins 属性统一设置间距。正是因为 layoutMarginGuide 反映的正是 view.bounds 经过 layoutMargins 调整过后的区域,便给了 layoutMarginGuide 使用上极大的灵活性,可以随时通过修改 layoutMargins 的值实现需要的布局。
在 iOS 8 系统中,同样可以直接使用 view 上带 margin 的锚点,这两者是等价的。
readableContentGuide (iOS 9)
很自然的,屏幕越大,显示的内容就越多。但对于文字内容来说,过大的屏幕宽度会带来阅读上的困难,读完一行之后很容易找不到下一行的开始,readableContentGuide 正是官方用来解决类似问题的方案,它提供了在不同大小屏幕上适合阅读文字的宽度。下面是在横竖屏状态下 iPhone/iPad 的效果:
使用方式也很简单,只需要在建立约束的时候选择 readableLayoutGuide 中的锚点:
NSLayoutConstraint.activate([
  label.topAnchor.constraint(equalTo: view.readableContentGuide.topAnchor),
  label.bottomAnchor.constraint(equalTo: view.readableContentGuide.bottomAnchor),
  label.leadingAnchor.constraint(equalTo: view.readableContentGuide.leadingAnchor),
  label.trailingAnchor.constraint(equalTo: view.readableContentGuide.trailingAnchor)
])
safeAreaLayoutGuide (iOS 11)
虽然推出的相对较晚,但 safeAreaLayoutGuide 可能是被使用最多的 layoutGuide 了。对于 safeAreaLayoutGuide 的介绍已经够多了,我就不再啰嗦,只聊一聊使用约束+safeAreaLayoutGuide 构建不同屏幕类型上 bottomBar 的技巧,例如:
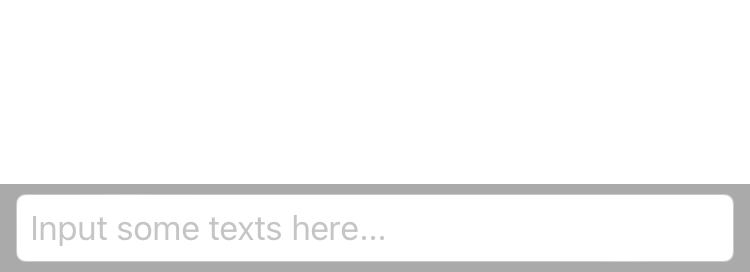
无需额外计算,只需要使用约束即可实现上述效果,三条原则:
- bottomBar 的高度不能手动指定,需要通过内容撑开
- bottomBar 的底部与 view 的 edge 建立约束,即忽略 safearea
- 内容的底部与
safeAreaLayoutGuide建立约束,即保证内容在 safearea 内
简单的代码示例:
NSLayoutConstraint.activate([
  bottomView.leadingAnchor.constraint(equalTo: view.leadingAnchor),
  bottomView.trailingAnchor.constraint(equalTo: view.trailingAnchor),
  bottomView.bottomAnchor.constraint(equalTo: view.bottomAnchor),

  textfield.topAnchor.constraint(equalTo: bottomView.topAnchor, constant: 5),
  textfield.bottomAnchor.constraint(equalTo: view.safeAreaLayoutGuide.bottomAnchor, constant: -5),
  textfield.leadingAnchor.constraint(equalTo: bottomView.layoutMarginsGuide.leadingAnchor),
  textfield.trailingAnchor.constraint(equalTo: bottomView.layoutMarginsGuide.trailingAnchor)
])
frameLayoutGuide/contentLayoutGuide (iOS 11)
当 Auto Layout 与 UIScrollView 结合起来时,甚至会让一些有着丰富布局经验的 iOS 开发者找不着北。究其原因,UIScrollView 本质上有两个大小,一是其作为一个通用 view 时,在其父 view 中的大小,即 scrollView.frame;另一个则是 UIScrollView 作为可滑动的内容,给其子 view 提供的大小,即 scrollView.contentSize。
在使用 frame 方式布局时,由于可以显式地设置 scrollView.contentSize,区分二者还不是十分复杂。但转为使用约束布局时,很容易让人弄不清楚自己的 view 究竟是在和 scrollView 的外在大小还是内在大小建立关联。遇到这种情况时,只需要记住一条原则:scrollView 的子 view 和 scrollView 建立的约束都是在和内在大小建立联系,此外的其他 view 都是和外在大小建立联系。
好在官方也意识到了这个问题,于是推出了 frameLayoutGuide/contentLayoutGuide 用于明确指定建立联系的对象,这两个新 guide 给 scrollView 的布局带来了许多方便:
首先,可以实现无需显式设置,而是通过内容大小确定 contentSize 的大小,建立约束的方法类似于 Self-Sizing Cell,需要水平/垂直两个方向上的足量约束:
NSLayoutConstraint.activate([
  scrollView.frameLayoutGuide.widthAnchor.constraint(equalTo: view.widthAnchor),
  scrollView.frameLayoutGuide.heightAnchor.constraint(equalTo: view.heightAnchor),
  scrollView.frameLayoutGuide.centerXAnchor.constraint(equalTo: view.centerXAnchor),
  scrollView.frameLayoutGuide.centerYAnchor.constraint(equalTo: view.centerYAnchor),

  button.topAnchor.constraint(equalTo: scrollView.contentLayoutGuide.topAnchor, constant: 1000),
  button.bottomAnchor.constraint(equalTo: scrollView.contentLayoutGuide.bottomAnchor, constant: -1000),
  button.leadingAnchor.constraint(equalTo: scrollView.contentLayoutGuide.leadingAnchor, constant: 1000),
  button.trailingAnchor.constraint(equalTo: scrollView.contentLayoutGuide.trailingAnchor, constant: -1000),
])
其次,对于一些固定高度或宽度,只需要单个方向滑动的 scrollView,可以通过直接在 frameLayoutGuide 与 contentLayoutGuide 之间建立关联实现,而不需要引入任何辅助 view。例如,实现一个垂直方向上有两页,而水平方向上不可滑动的 scrollView:
NSLayoutConstraint.activate([
  scrollView.frameLayoutGuide.widthAnchor.constraint(equalTo: view.widthAnchor),
  scrollView.frameLayoutGuide.heightAnchor.constraint(equalTo: view.heightAnchor),
  scrollView.frameLayoutGuide.centerXAnchor.constraint(equalTo: view.centerXAnchor),
  scrollView.frameLayoutGuide.centerYAnchor.constraint(equalTo: view.centerYAnchor),

  scrollView.contentLayoutGuide.widthAnchor.constraint(equalTo: scrollView.frameLayoutGuide.widthAnchor),
  scrollView.contentLayoutGuide.heightAnchor.constraint(equalTo: scrollView.frameLayoutGuide.heightAnchor, multiplier: 2),

  button.centerXAnchor.constraint(equalTo: scrollView.contentLayoutGuide.centerXAnchor),
  button.centerYAnchor.constraint(equalTo: scrollView.contentLayoutGuide.centerYAnchor),
])
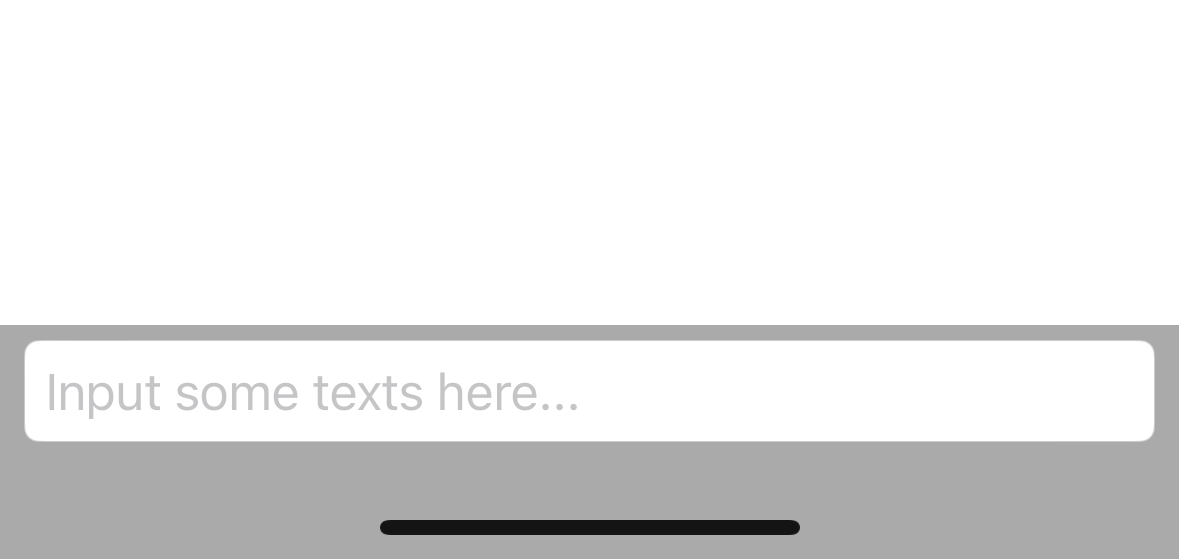
keyboardLayoutGuide (iOS 15)
在软键盘弹起时上移底部输入框从而避免被键盘遮挡是一个常见的场景,但一直以来,实现这种需求的方式只有监听键盘通知一种。无论是使用 transform 调整输入框的位置,还是调整底部约束的 constant 值,都有一种代码零碎的感觉。此外,还需要读取键盘弹起/消失的动画参数,手动实现相同的动画效果。如果能够提供和键盘位置建立约束的锚点,这些问题不就完全可以轻松解决了吗?似乎官方也意识到了这个问题,iOS 15 中就提供了 keyboardLayoutGuide 来实现类似需求。
回到我们之前底部输入框的 case,需要做的修改非常简单,由于 textfield 需要保持在键盘范围之外,只需要调整 textfield 的底部约束:
// textfield.bottomAnchor.constraint(equalTo: view.safeAreaLayoutGuide.bottomAnchor, constant: -5),
textfield.bottomAnchor.constraint(equalTo: view.keyboardLayoutGuide.topAnchor, constant: -5),
不需要任何一行代码监听通知、自定义动画,一切看起来十分自然:
用 keyboardLayoutGuide 处理 iPhone 上的键盘布局问题可以说是大材小用了,实际上官方推出 keyboardLayoutGuide 更主要是为了解决 iPad 上更加复杂的键盘布局问题,例如浮动键盘的处理,外设连接/断开过程中软硬键盘的切换、以及相机扫描文字输入等场景。更加深入的介绍可以参考:Your guide to keyboard layout。
自定义 UILayoutGuide
系统提供了许多方便的 UILayoutGuide,但在一些业务场景下还是会有没有现成可用,需要自定义的情况。好在自定义 UILayoutGuide 同样十分方便,类似于使用辅助 view,也有三个步骤:
- 构建一个
UILayoutGuide。 - 调用
view.addLayoutGuide方法,将自定义的 layoutGuide 添加到合适的 view 上。 - 给自定义 layoutGuide 建立约束。
回到本文开头的问题实践一下,建立一个 1/3 父 view 高度的 layoutGuide:
// step 1
let customGuide = UILayoutGuide()

// step 2
view.addLayoutGuide(customGuide)

// step 3
NSLayoutConstraint.activate([
  customGuide.topAnchor.constraint(equalTo: view.topAnchor),
  customGuide.heightAnchor.constraint(equalTo: view.heightAnchor, multiplier: 1 / 3)
])
接下来即可按照相同的方式使用了:
NSLayoutConstraint.activate([
  button.topAnchor.constraint(equalTo: customGuide.bottomAnchor),
  button.centerXAnchor.constraint(equalTo: view.centerXAnchor)
])
最后提几点注意事项:
- 类似于 view 之间建立约束,layoutGuide 与 view 之间建立约束同样需要二者拥有共同的视图层级,如果遇到类似运行时报错,检查建立约束时 layoutGuide 和 view 是否都加到了视图层级之上。
- 相比 helperView,由于 layoutGuide 不需要绘制,对于一些只在特定水平/垂直方向上提供布局锚点的 layoutGuide,不需要在两个方向建立完备的约束,只需关注所需方向即可。
- 类似于
NSLayoutConstraint,UILayoutGuide同样提供了identifier属性用于标记,对于涉及到多个 layoutGuide 的布局场景,设置identifier可以提高 debug 时约束的可读性。